Saturday, May 9, 2020

How to create Microsoft Flow with Dynamics 365 CRM On-premise

Introduction

Recently, while trying to work on Microsoft Flow to perform some actions from Dynamics CRM on-premise, we discovered that to access on-premise data we needed to create connection with Microsoft flow.
So, in this blog we will show how you can connect your on-premise organization with Microsoft flow.
It is possible to connect Microsoft flow with CRM on-premise with the help of “On-premises data gateway”. By using the data gateway we can create connection with Microsoft Flow via SQL server. Let’s see what are steps needed to be followed for the same.
1. First you need to install the “On-premises data gateway.” Click here to download the same and complete the installation process.
Note: You need to install a gateway on a machine that is in the same network as the SQL server. This machine must be always on and be always connected to the internet.
2. Post installation, you need to sign in to register the data gateway. See below screenshot:
Note: For signing in you need to use the same credentials which you are using to sign in to the Microsoft flow.
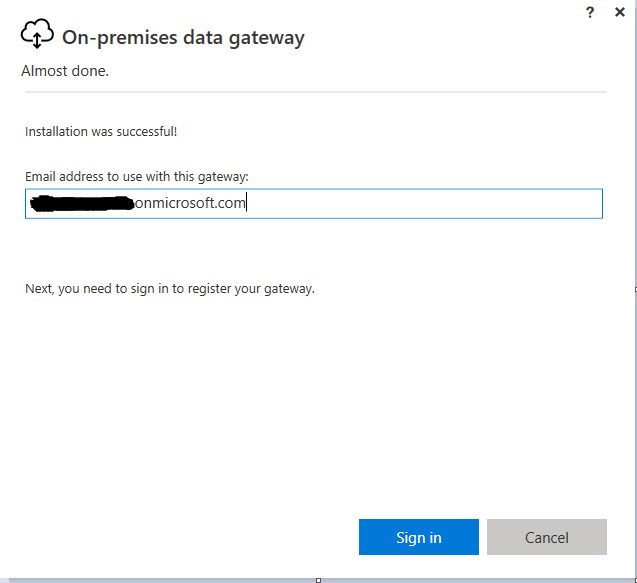
Microsoft Flow with Dynamics 365 CRM On-premise
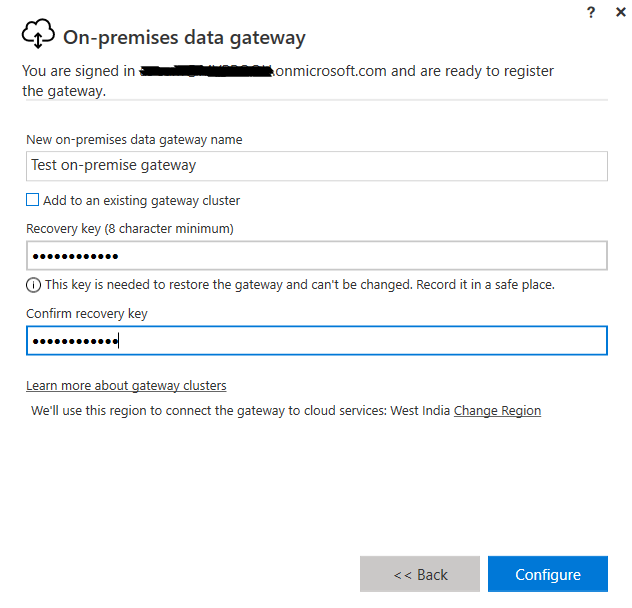
3. Once you sign-in you are ready to register the gateway as shown in screenshot below:
Microsoft Flow with Dynamics 365 CRM On-premise
In the above screenshot you will see that there are 3 fields:
  • New on-premises data gateway name: Used to define the name. You can give any name of your choice.
  • Recovery Key: The recovery key will be needed if you ever need to migrate, restore or take over a gateway. You can enter any value for key.
  • Confirm Recovery: Re-enter the Recovery key.
4. Once you register the gateway, you need to sign in into the Microsoft flow using https://us.flow.microsoft.com
5. Then, click on settings icon on top right corner and select the “Connections” to create the new connection as shown in the below screenshot.
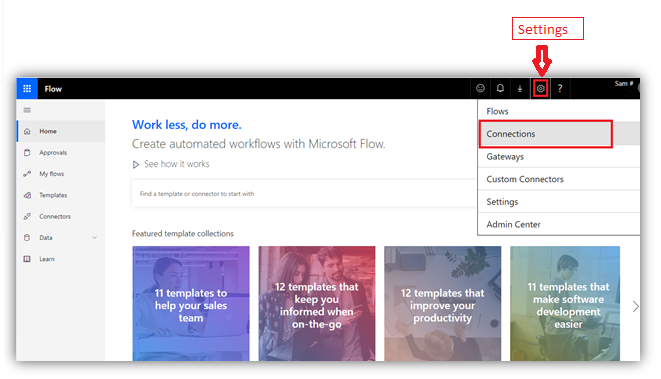
Microsoft Flow with Dynamics 365 CRM On-premise
6. Click on “New Connection” button on top left corner and select “SQL Server” as shown in below screenshot.
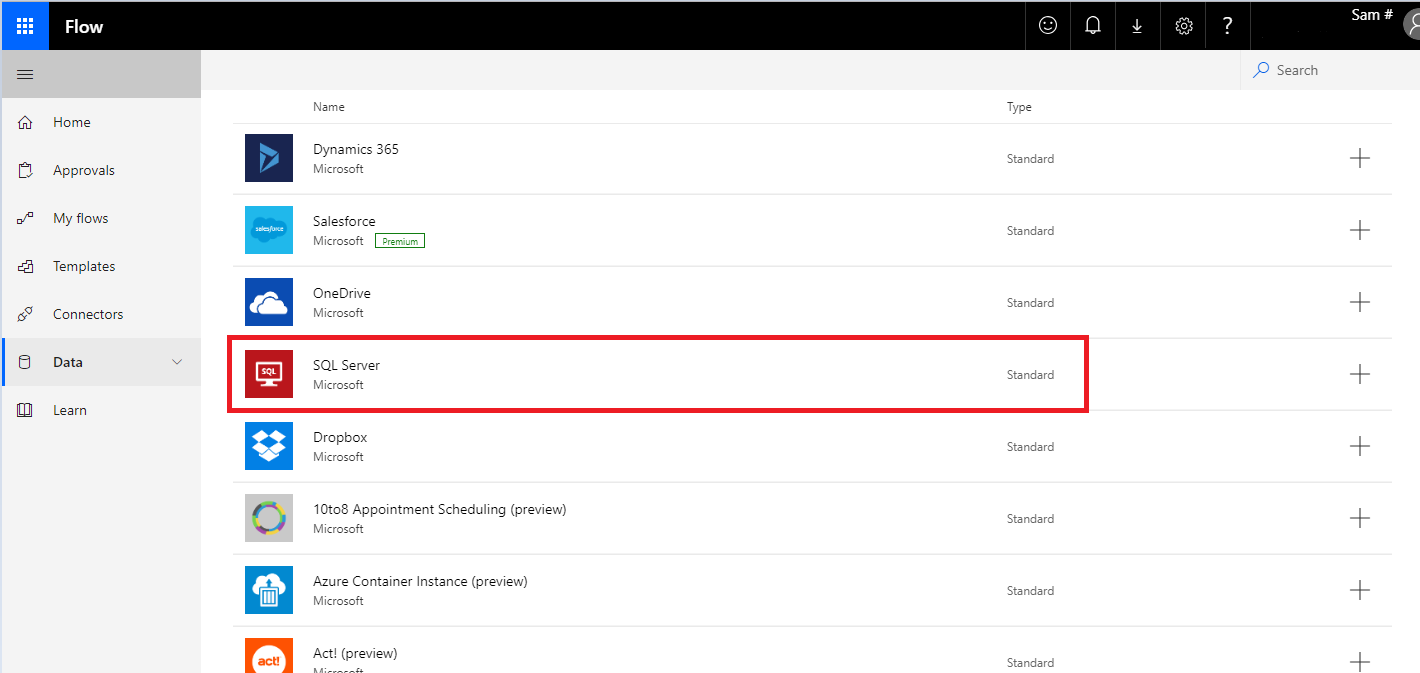
Microsoft Flow with Dynamics 365 CRM On-premise
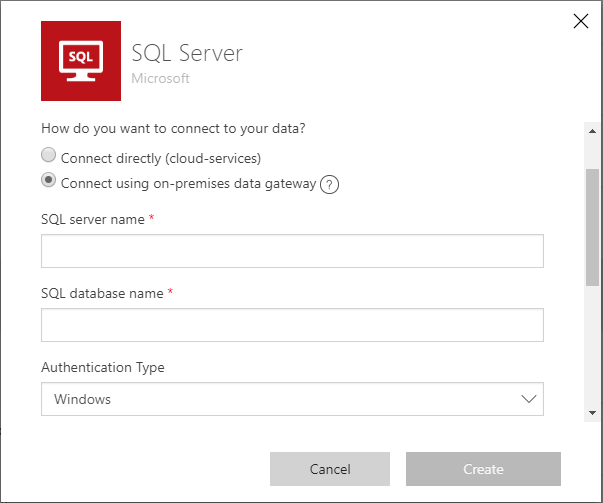
7. On clicking the “SQL server” connections a window will pop up as shown in the below screenshot.
Microsoft Flow with Dynamics 365 CRM On-premise
8. To connect to on-premises data choose the option “Connect using on-premises data gateway” as shown in the above screenshot.
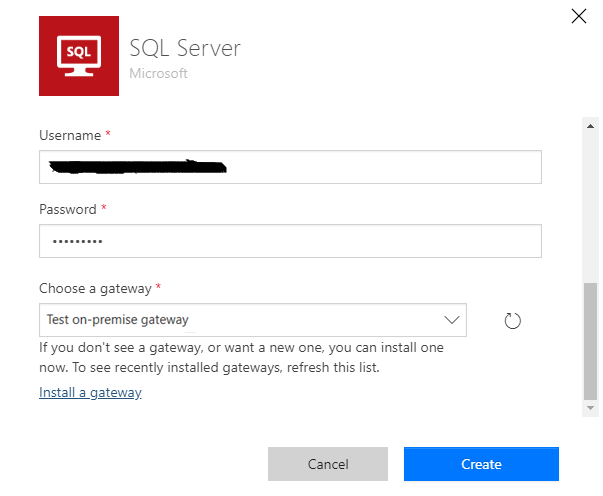
9. Then, fill all the details of SQL server and choose the gateway which we installed as shown in below screenshot and click on “Create” button to create the connection.
Microsoft Flow with Dynamics 365 CRM On-premise
10. Post successful creation of connection you can use the Microsoft flow for the on-premise organization using the SQL server connectors in the same way we use it for any online CRM.
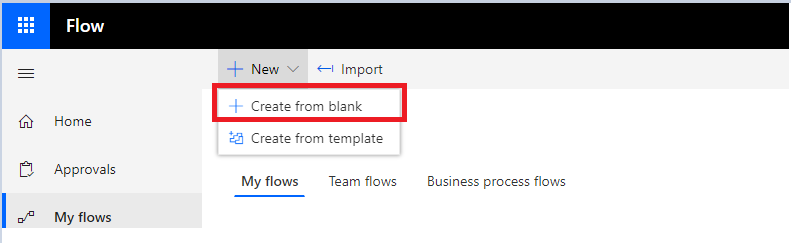
11. We have created one sample flow by using SQL server connectors to show how it works. In the example below, we have created a flow to send an Email whenever a new “Account” record gets added in the integrated SQL database. To accomplish the same we have selected the “Create from blank” option as shown in the below screenshot:
Microsoft Flow with Dynamics 365 CRM On-premise
12. Now select the connectors as “SQL server” as shown below:
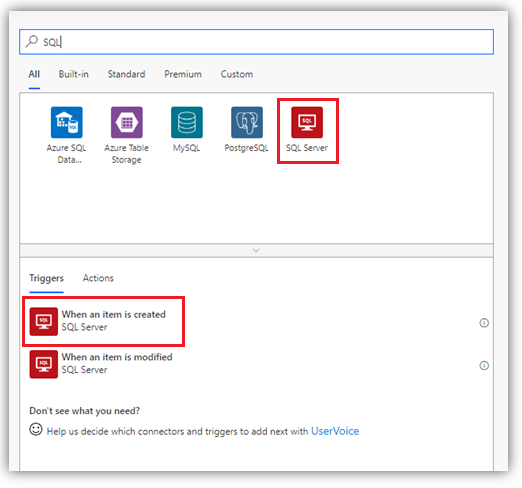
Microsoft Flow with Dynamics 365 CRM On-premise13. Here, we want to trigger this flow when new record gets created into the SQL database. So, we are selecting the 1st option i.e. “When an item is created” as can be seen in the above screenshot.
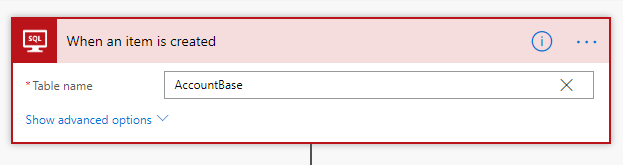
14. Here, we want to trigger this flow when new record gets created into the SQL database. So, we are selecting the 1st option i.e. “When an item is created” as can be seen in the above screenshot.
Microsoft Flow with Dynamics 365 CRM On-premise
15. Next, select the action as “Send Email“ on Gmail account. Here, we need to sign in to Gmail account.
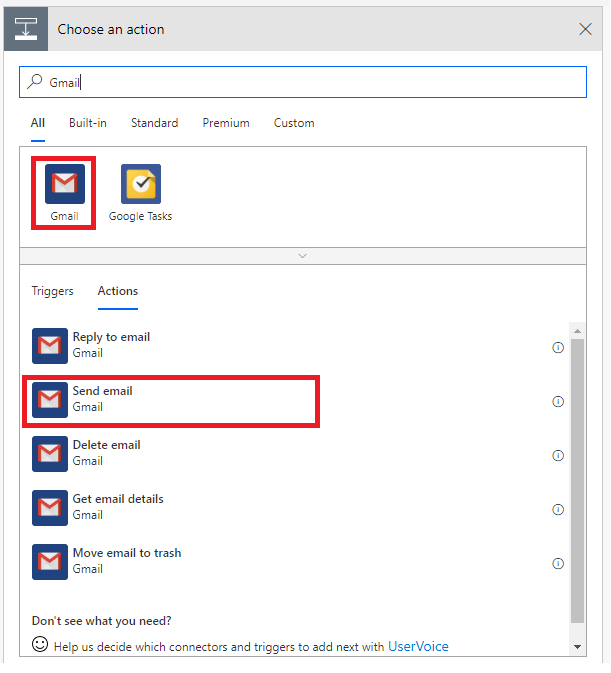
Microsoft Flow with Dynamics 365 CRM On-premise
16. Then, fill the necessary fields to be used for sending an email. We can also access the fields from the SQL database and map them in the attributes needed to send an email as shown below:
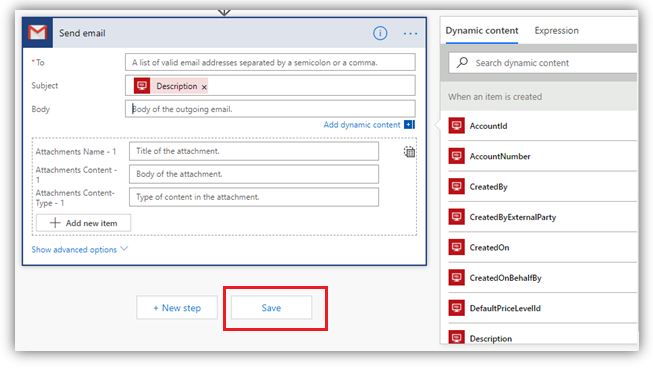
Microsoft Flow with Dynamics 365 CRM On-premise
Once we are ready by creating the flow then, just save it and we are good to go.

On-Demand Microsoft Flow for Dynamics 365 and PowerApps

On-Demand Microsoft Flow - What is it?

If you have been using Dynamics 365 (CRM) for sometime, you will know about on-demand workflows. They are a way to allow users to run automation only when needed. They will not run through some sort of automated trigger.
So, like the on-demand workflows of old, we are now in the age of Microsoft Flow. We can now create on-demand Microsoft Flows to provide on-demand automation.

First Things First - Dynamics 365 Settings

Prior to utilizing Microsoft Flows within Dynamics 365, you will need to enable this setting. New versions of Dynamics 365 since the October 2019 update will have Microsoft Flows already enabled.
To enable the setting, you will need to navigate to Settings>System Settings>Customizations. Next, click on "Yes" under "Enable Microsoft Flow".
Microsoft Flow setting in Dynamics 365

Second Things Second(?) - PowerApps Settings

The Power Platform Admin Center contains the Microsoft Flow setting as well. To enable the setting, you will need to navigate to https://admin.powerplatform.com>Click your Environment name>Settings>Behavior. Next, toggle the "Show Microsoft Flow on forms and in the site map" setting to "On".
Microsoft Flow setting in Power Platform admin center

Microsoft Flow Menu Button

Once the settings are enabled, the Microsoft Flow menu button will be visible in various places. First, you will see the menu button above a view in Dynamics 365.
Microsoft Flow menu button above a View
Second, you will see the menu button at the top of a record form in Dynamics 365.
Microsoft Flow menu button on a record form
Third, you will see the Microsoft Flow option in the classic Dynamics 365 Settings Menu.
Microsoft Flow option in the Dynamics 365 Settings
Fourth, you will see the menu button at the top of a view in a model-driven PowerApp.
Microsoft Flow menu button above a View in PowerApps
Fifth, you will see the menu button at the top of a record in a model-driven PowerApp.
Microsoft Flow menu button on a record form in PowerApps

Start Creating the On-Demand Microsoft Flow

Now, we are at the fun part of creating a Microsoft Flow! You can start your Microsoft Flow creation in a couple of ways. You can navigate to https://flow.microsoft.com, or you can navigate to https://make.powerapps.com and select "Flows" on the right-hand side.
The example today will be a simple one, and it's only meant to demonstrate how to set up the on-demand Microsoft Flow.
On the Microsoft Flow site, click on "New" and select "Instant - from blank".
Microsoft Flow create new Instant Flow
Next comes a small tip you need to know. When the "Build an instant flow" window appears, the "When a record is selected" option is NOT visible.
Build an instant flow - When a record is selected is missing
Now, click on the "Skip" button at the bottom, and this will load the "Search connectors and triggers" screen.
Microsoft Flow - Search connectors and triggers screen
Now comes the tip. Type "Common Data Service" in the search field, and you will now see the "When a record is selected" option.
Build an instant flow - When a record is selected is now visible

Building the On-Demand Microsoft Flow

After the "When a record is selected" option is available, select it. Next, give your Microsoft Flow a name, and then select an Environment and an Entity. Also, be sure to rename the first step to something more meaningful.
Build an instant flow - Creating a Flow - First Steps
The next step will update the Account Name on the Account record to uppercase.
Build an instant flow - Creating a Flow - Next Step
  1. Rename the step
    • Always put a meaningful name on your Flow steps.
  2. Select the Environment
    • Use the "Current" option from the list. This will make exporting and importing Flows from environment to environment easier.
  3. Select the Entity
    • Choose the correct entity to use in the action.
  4. Input the "Record Identifier"
    • Select the "Account" option using the fields available from the prior step.
  5. Update the field
    • This is where the Account Name will get updated to uppercase. The formula to use here is toUpper(triggerBody()?['entity']?['name']).

Microsoft Flow Tips

Before we continue, I wanted to provide some quick tips to help you build the expression used above. The expression portion of "triggerBody()?['entity']?['name']" is the code for the Account Name field. Now, let's look into how you can obtain this.
First, let's get the code for the Account Name field. Select the "Account Name" field from the list so that it appears in the field. Then click on the ellipsis button and choose "Peek code".
Build an instant flow - Expression tips
Second, look in the code list and you will see the "name" code in the middle. Highlight the code to copy it, but DO NOT copy the "@" symbol and the "" quotes.
Build an instant flow - Peek code info
Third, you need to know how to input an Expression. Remove the "Account Name" field you just added, and click on the field in the action step. Next, choose the Expression tab on the pop-out box.
Build an instant flow - Start the input of an Expression
Fourth, type in the expression "toupper()" (without quotes) in the Expression field. Now, paste the code you copied from the second step above. The expression should look like the below screen shot.
Build an instant flow - Expression code
Lastly, your Flow should look like this. Be sure to save the Flow now.
Build an instant flow - Finished Flow

Running the On-Demand Microsoft Flow in Dynamics 365

The last step is to run the Flow in Dynamics 365, and in PowerApps, to see if it will work. After you have saved your Microsoft Flow, you should now see it within the Microsoft Flow menu button.
Microsoft Flow menu button
Next, click on the Flow and a "Run Flow" window will pop up. Click on the "Run Flow" button.
Microsoft Flow menu button - Run Flow
Once the Flow runs, you should refresh the list and you will see the "Consolidated Messenger" account name is now uppercase.
Microsoft Flow - Account Name is now uppercase

Running the On-Demand Microsoft Flow in PowerApps

Lastly, let's look at this within a model-driven PowerApp.
Microsoft Flow menu button in model-driven PowerApp
After the Flow has been run, you will now see the Account Name is uppercase.
Microsoft Flow - Account Name is now uppercase in model-driven PowerApp

In Closing

You will need to keep in mind that the Flows need to be set up for each Environment. I had set up 2 Flows with one for the Dynamics 365 environment and one for the PowerApps environment.

Thursday, May 7, 2020

D365 CRM Run flows on a schedule

Create a recurring flow

  1. Sign in to Power Automate, and then select My flows in the top navigation bar.
    My flows option
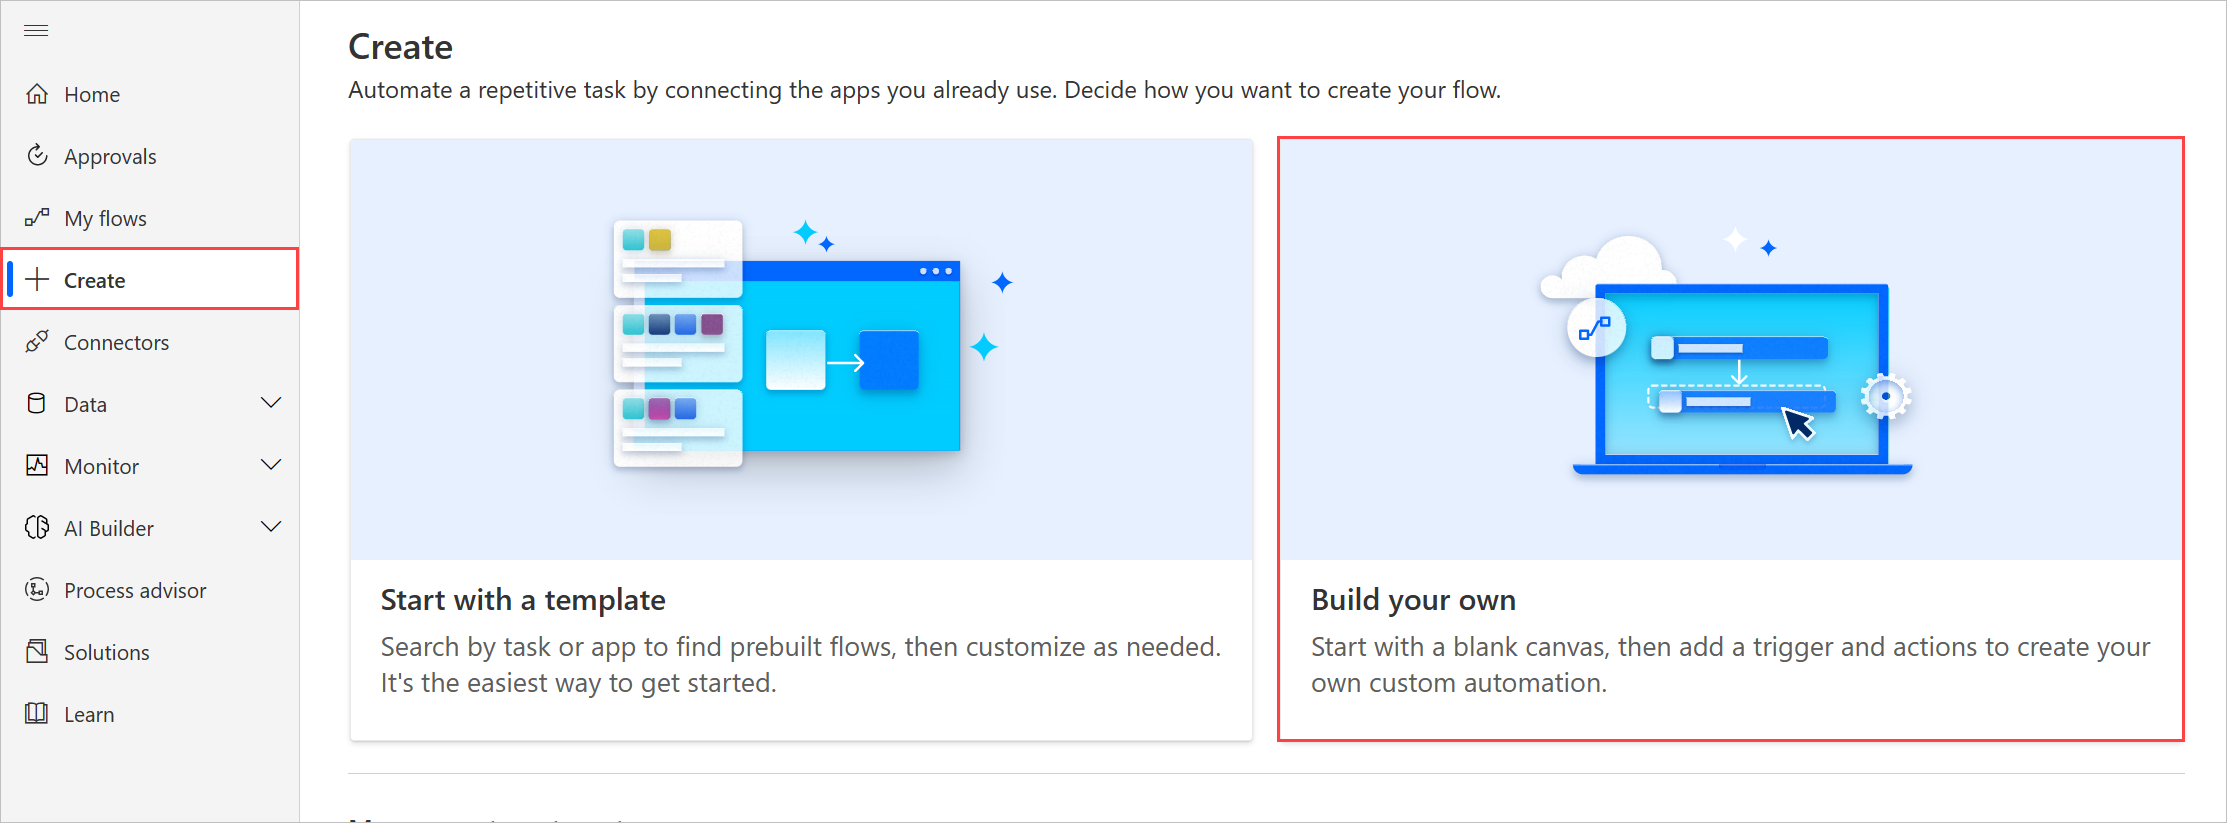
  2. Select Create from blank.
    Create a flow from blank
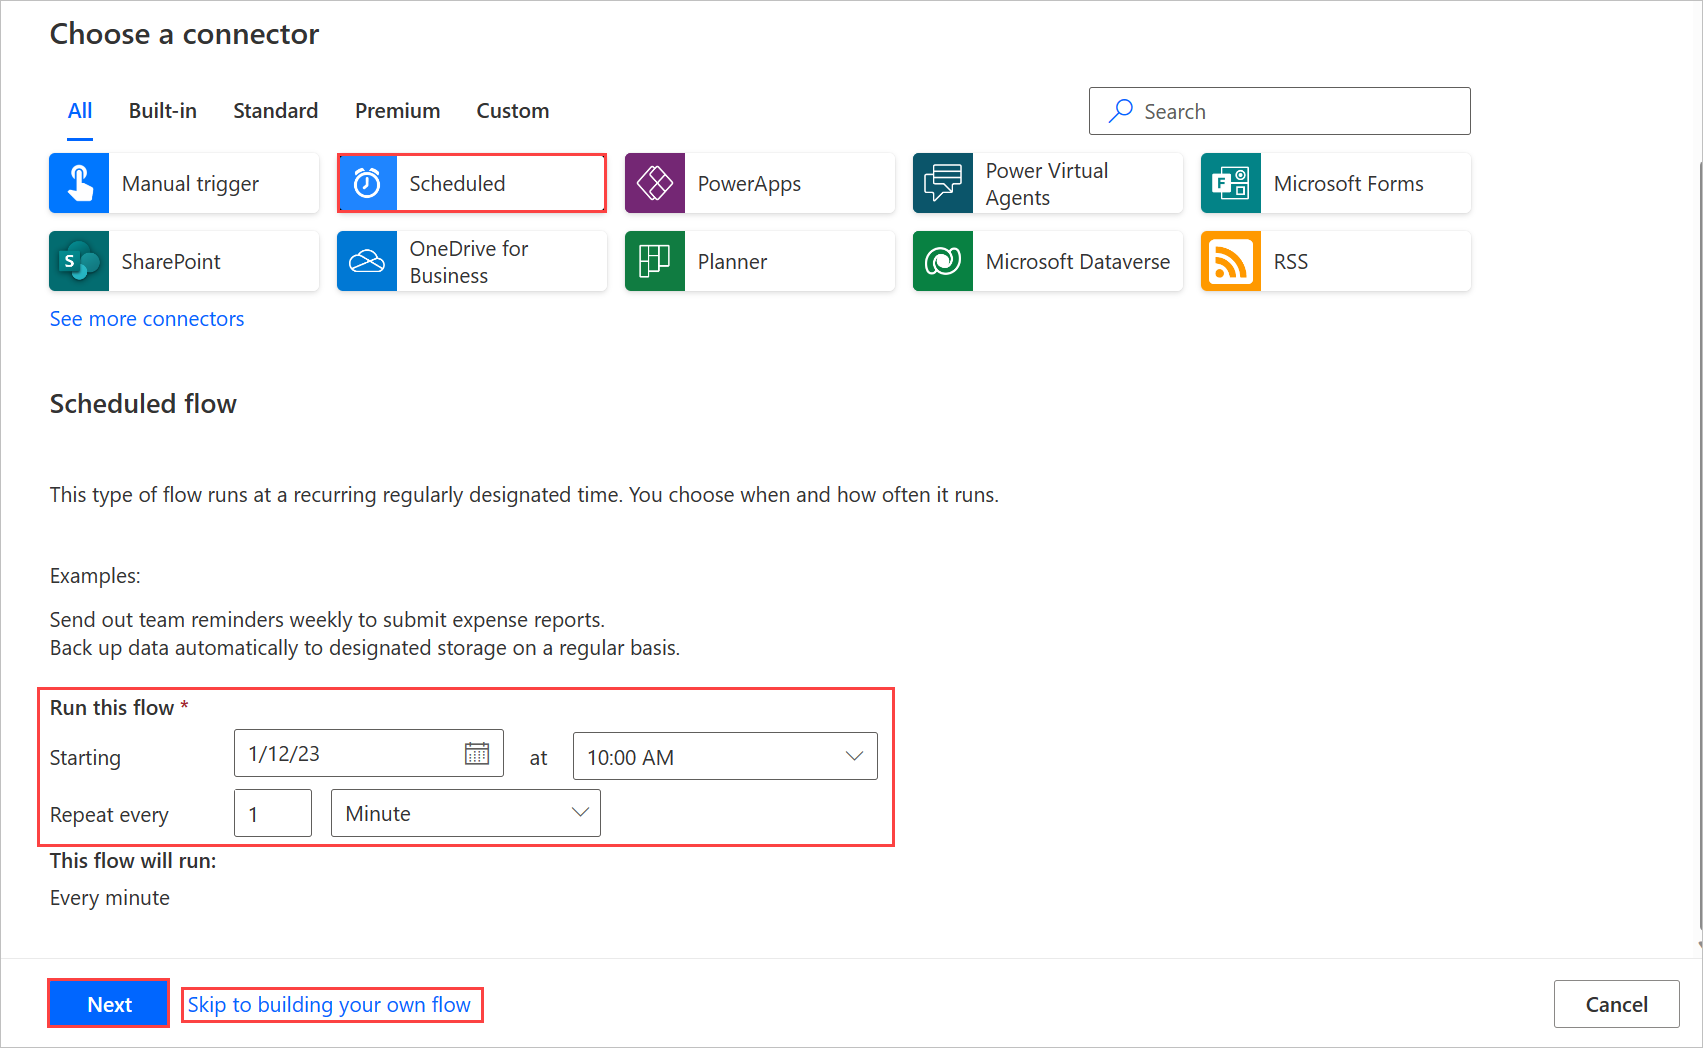
  3. In the Search all connectors and triggers box, type Recurrence, and then select Schedule - Recurrence.
    Find recurrence trigger
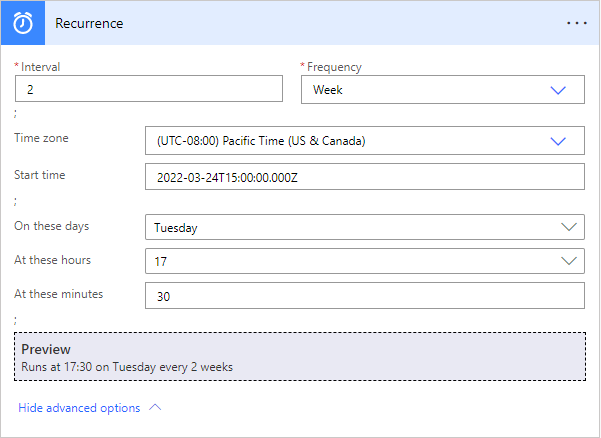
  4. In the Recurrence dialog box, specify how often you want the flow to run.
    For example, specify 2 under Interval and Week under Frequency if you want the flow to run every two weeks.
    Specify recurrence

Specify advanced options

  1. Follow the steps in the previous section, and then select Show advanced options.
    Note: These options change based on the values to which Interval and Frequency are set. If your screen doesn't match the graphic below, make sure that Interval and Frequency are set to the same values that the graphic shows.
  2. Select a Time zone to specify whether the Start time reflects a local time zone, Universal Coordinated Time (UTC), etc.
  3. Specify a Start time in this format:
    YYYY-MM-DDTHH:MM:SSZ
  4. If you specified Day under Frequency, specify the time of day when the flow should run.
  5. If you specified Week under Frequency, specify the day or days of the week on which the flow should run and the time or times of day when the flow should run.
    For example, configure the options as shown to start a flow no sooner than noon (Pacific time) on Monday, January 1, 2018, and run it every two weeks on Tuesdays at 5:30p (Pacific time).
    Specify advanced options
  6. Add the action or actions that you want the flow to take, as Create a flow from scratch describes.

Delay a flow

  1. Sign in to Power Automate, and then select My flows in the top navigation bar.
    Create a flow from blank
  2. Select Create from blank.
    Create a flow from blank
  3. Specify an event as Create a flow from scratch describes.
  4. Select New step, and then select Add an action.
    Option to add an action to a flow
  5. In the list of actions, do either of the following:
    • Select Delay, specify a Count, and specify a Unit of time such as second, minute, or hour.
    • Select Delay until, and then specify a date in this format.
      YYYY-MM-DDTHH:MM:SSZ
      Add a delay Specify delay in units of time Specify delay until

Create a flow by using Dynamics 365 CRM (online)

Create a flow from a template

You can create a flow using one of the many templates available, such as these examples:
  • When an object is created in Dynamics 365, create a list item in SharePoint.
  • Create Dynamics 365 lead records from an Excel table.
  • Copy Dynamics 365 accounts to customers in Dynamics 365 for Operations.
To create a flow from a template, follow these steps.
  1. Sign in to the Power Automate website.
  2. Click or tap Services, and then click or tap Dynamics 365.
  3. Several templates are available. To get started, select the template that you want.

Create a task from a lead

If a template isn’t available for what you need, create a flow from scratch. This walkthrough shows you how to create a task in Dynamics 365 whenever a lead is created in Dynamics 365.
  1. Sign in to the Power Automate website.
  2. Click or tap My flows, and then click or tap Create from blank.
  3. In the list of flow triggers, click or tap Dynamics 365 - When a record is created.
  4. If prompted, sign in to Dynamics 365.
  5. Under Organization Name, select the Dynamics 365 instance where you want the flow to listen.
  6. Under Entity Name, select the entity that you want to listen to, which will act as a trigger initiating the flow.
    For this walkthrough, select Leads.
    Flow details
    [IMPORTANT] In order for the flow to trigger on the Dynamics 365 entity, the entity definition must have Change Tracking enabled. See Enable change tracking to control data synchronization
  7. Click or tap New step, and then click or tap Add an action.
  8. Click or tap Dynamics 365 – Create a new record.
  9. Under Organization Name, select the Dynamics 365 instance where you want the flow to create the record. Notice that it doesn’t have to be the same instance where the event is triggered from.
  10. Under Entity Name, select the entity that will create a record when the event occurs.
    For this walkthrough, select Tasks.
  11. Subject box appears. When you click or tap it, a dynamic content pane appears where you can select either of these fields.
    • Last Name. If you select this field, the last name of the lead will be inserted in the Subject field of the task when it's created.
    • Topic. If you select this field, the Topic field for the lead will be inserted in the Subject field of the task when it's created.
    For this walkthrough, select Topic.
    Flow add topic
    Tip: On the dynamic content pane, click or tap See more to display more fields that are associated with the entity. For example, you can also populate the Subject field of the task with the Company NameCustomerDescription, or Email field of the lead.
  12. Click or tap Create flow.

Create a Wunderlist task from a Dynamics 365 task

This walkthrough shows you how to create a task in Wunderlist whenever a task is created in Dynamics 365. Wunderlist is an Internet-based service that you can use to create to-do lists, add reminders, or track errands.
  1. Sign in to the Power Automate website.
  2. Click or tap My flows, and then click or tap Create from blank.
  3. In the list of flow triggers, click or tap Dynamics 365 - When a record is created.
  4. Under Organization Name, select the Dynamics 365 instance where you want the flow to listen.
  5. Under Entity Name, select the entity that you want to listen to, which will act as a trigger to initiate the flow.
    For this walkthrough, select Tasks.
  6. Click or tap New step, and then click or tap Add an action.
  7. Type create a task, and then click or tap Wunderlist – Create a task.
  8. Under List ID, select inbox.
  9. Under Title, select Subject in the dynamic content pane.
  10. Click or tap Create flow.

Trigger based logic

Triggers like When a record is createdWhen a record is updated, and When a record is deleted initiate your flow within a few minutes of the event occurring. In rare cases, your flow can take up to 2 hours to trigger.
When the trigger occurs, the flow receives a notification, but the flow runs on data that exists at the time the action runs. For example, if your flow triggers when a new record is created, and you update the record twice before the flow runs, your flow runs only once with the latest data.

Specify advanced options

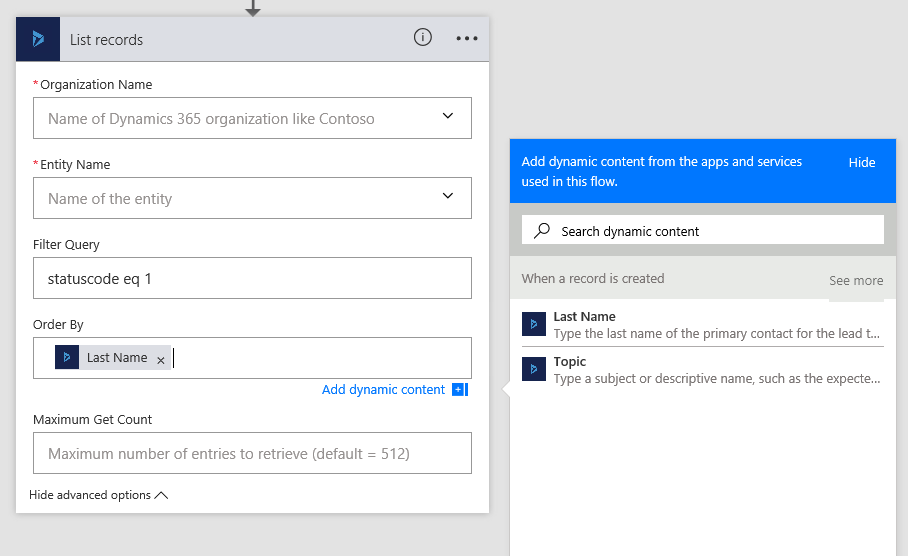
When you add a step to a flow, you can click or tap Show advanced options to add a filter or order by query that controls how the data is filtered in the flow.
For example, you can use a filter query to retrieve only active contacts, and you can order them by last name. To do this, enter the OData filter query statuscode eq 1 and select Last Name from the dynamic content pane. For more information about filter and order by queries, see MSDN: $filter and MSDN: $orderby.
Flow orderby query

How to Deploy your API as a web app or API app

  Before you can call your custom API from a logic app workflow, deploy your API as a web app or API app to Azure App Service. To make your ...