Create a flow from a template
You can create a flow using one of the many templates available, such as these examples:
- When an object is created in Dynamics 365, create a list item in SharePoint.
- Create Dynamics 365 lead records from an Excel table.
- Copy Dynamics 365 accounts to customers in Dynamics 365 for Operations.
To create a flow from a template, follow these steps.
- Sign in to the Power Automate website.
- Click or tap Services, and then click or tap Dynamics 365.
- Several templates are available. To get started, select the template that you want.
Create a task from a lead
If a template isn’t available for what you need, create a flow from scratch. This walkthrough shows you how to create a task in Dynamics 365 whenever a lead is created in Dynamics 365.
- Sign in to the Power Automate website.
- Click or tap My flows, and then click or tap Create from blank.
- In the list of flow triggers, click or tap Dynamics 365 - When a record is created.
- If prompted, sign in to Dynamics 365.
- Under Organization Name, select the Dynamics 365 instance where you want the flow to listen.
- Under Entity Name, select the entity that you want to listen to, which will act as a trigger initiating the flow.For this walkthrough, select Leads.
 [IMPORTANT] In order for the flow to trigger on the Dynamics 365 entity, the entity definition must have Change Tracking enabled. See Enable change tracking to control data synchronization
 - Click or tap New step, and then click or tap Add an action.
- Click or tap Dynamics 365 – Create a new record.
- Under Organization Name, select the Dynamics 365 instance where you want the flow to create the record. Notice that it doesn’t have to be the same instance where the event is triggered from.
- Under Entity Name, select the entity that will create a record when the event occurs.For this walkthrough, select Tasks.
- A Subject box appears. When you click or tap it, a dynamic content pane appears where you can select either of these fields.
- Last Name. If you select this field, the last name of the lead will be inserted in the Subject field of the task when it's created.
- Topic. If you select this field, the Topic field for the lead will be inserted in the Subject field of the task when it's created.
For this walkthrough, select Topic. Tip: On the dynamic content pane, click or tap See more to display more fields that are associated with the entity. For example, you can also populate the Subject field of the task with the Company Name, Customer, Description, or Email field of the lead.
 - Click or tap Create flow.
Create a Wunderlist task from a Dynamics 365 task
This walkthrough shows you how to create a task in Wunderlist whenever a task is created in Dynamics 365. Wunderlist is an Internet-based service that you can use to create to-do lists, add reminders, or track errands.
- Sign in to the Power Automate website.
- Click or tap My flows, and then click or tap Create from blank.
- In the list of flow triggers, click or tap Dynamics 365 - When a record is created.
- Under Organization Name, select the Dynamics 365 instance where you want the flow to listen.
- Under Entity Name, select the entity that you want to listen to, which will act as a trigger to initiate the flow.For this walkthrough, select Tasks.
- Click or tap New step, and then click or tap Add an action.
- Type create a task, and then click or tap Wunderlist – Create a task.
- Under List ID, select inbox.
- Under Title, select Subject in the dynamic content pane.
- Click or tap Create flow.
Trigger based logic
Triggers like When a record is created, When a record is updated, and When a record is deleted initiate your flow within a few minutes of the event occurring. In rare cases, your flow can take up to 2 hours to trigger.
When the trigger occurs, the flow receives a notification, but the flow runs on data that exists at the time the action runs. For example, if your flow triggers when a new record is created, and you update the record twice before the flow runs, your flow runs only once with the latest data.
Specify advanced options
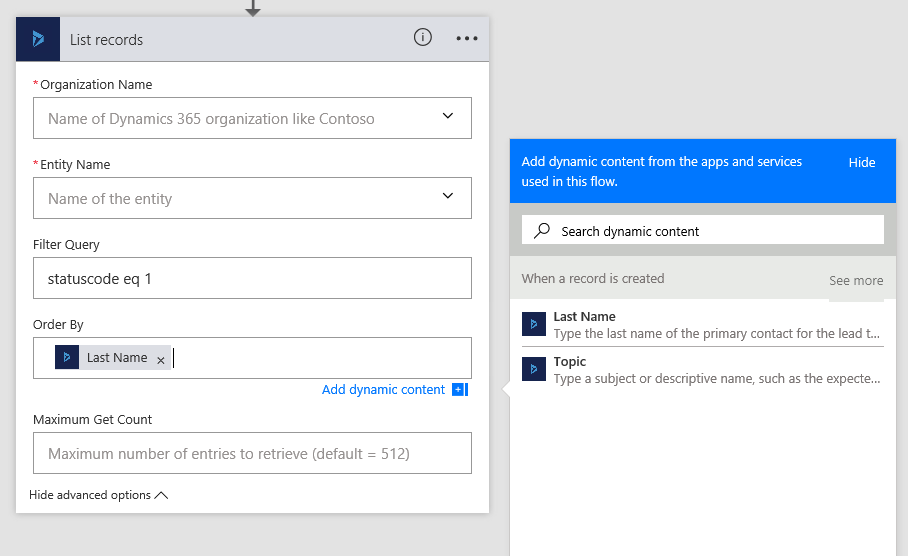
When you add a step to a flow, you can click or tap Show advanced options to add a filter or order by query that controls how the data is filtered in the flow.
For example, you can use a filter query to retrieve only active contacts, and you can order them by last name. To do this, enter the OData filter query statuscode eq 1 and select Last Name from the dynamic content pane. For more information about filter and order by queries, see MSDN: $filter and MSDN: $orderby.


No comments:
Post a Comment