Login to the required environment and go to flows and select Business process flows as shown below figure.
Step 2
After Step 1, click on Vaccination Business process flow and click on edit and go to components and select existing stage Provide Discount as shown in the below figure.
Step 3
After Step 2, on Provide Discount Stage select components in the right and select Workflow under Composition section, and drag and drop under triggered Process as shown in the below figure.
Step 4
After Step 3, Select workflow and in the right side window select Trigger as Stage Exit and under Workflows select existing OOB Workflow VaccineDiscount and name it as VaccineDiscount, click on Apply as shown in the below figure.
Step 5
After Step 4, after providing all the values final BPF Looks like this as shown in the below figure.
Step 6
After Step 5, validate and update BPF and then select any contact and change status of Vaccination to Yes and provide discount of 50 % and click on Next Stage as shown in the below figure.
Step 7
After Step 6, now as a quick test navigate to Vaccine Discount Workflow process and under Process Sessions select recent execution and an email be sent to selected contact as shown in the below figure.
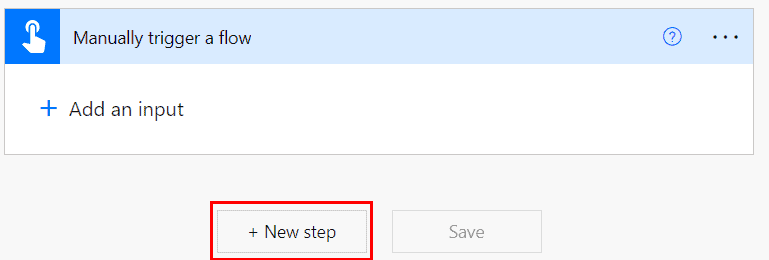
Every flow starts with a trigger. This time I’ll go with a manual trigger with an email input field (so I can also send bad jokes to my poor co-workers).
HTTP action
And now we need a joke. The action for this in Power Automate is HTTP. Official Joke API does not require authentication, so we can just set the method and URI.
The base URL for the Joke API is https://official-joke-api.appspot.com/. There is no base path in this particular case.
There are several endpoints available for the Joke API, but in this exercise I’ve decided to use /random_joke.
The API documentation doesn’t say which method to use, but in this case we can safely assume that the method is GET since we only want to grab a new joke.
Method: GET URI: https://official-joke-api.appspot.com/random_joke
Now save the flow and make a test run. If everything works, you should have a little joke in the body of your HTTP action in JSON format. Here’s an example:
{
  "id": 162,
  "type": "general",
  "setup": "What did Michael Jackson name his denim store?",
  "punchline": "Billy Jeans!"
}
Make sure to copy the text content from the body field. We need it in the next step!
Parse JSON
We get the joke in neat JSON format, but to separate the setup from the punchline, we need the Parse JSON action. Parse JSON… parses the JSON so we can use the values later as dynamic content.
So, as the content we set the body from the previous HTTP action. And then we need a schema to define the structure and the content of a JSON object.
But from where is this schema coming?
If you have followed my instructions carefully, you should have the JSON content copied. If not, go ahead and do it now. (Or be lazy and copy the JSON example above.)
Choose the generate the schema from a sample (because we have a sample; the JSON we copied from the HTTP request body field).
Paste the JSON from the HTTP request body to the sample editor and click “Done”. It will generate the schema for you automatically.
JSON Schema is a grammar language for defining the structure, content etc.
For example here we can see that ID is a whole number (integer) and the joke is text (string).
Now we have the joke, and we have parsed it with Parse JSON action. We can now use the setup and the punchline as separate dynamic values.
Post message
I want to use the Flow bot to post the messages so I choose the action “Post a message as the Flow bot to a user”.
I add the email from the trigger to the recipient field. But to the message I can choose values from the Parse JSON action. Pretty cool.
For the first message I want the setup value and for the second I want the punchline value. And a little 10 second delay between since isn’t that how you tell these jokes in real life? ?
Now we have all the blocks ready in our flow and we can go ahead and test it. I hope you get a better joke than me though.
Congratulations, you have now successfully built a cloud flow using an API. And this is almost all there is to it. Well, not really. But understanding the basic terminology and how to implement things with Power Automate certainly helps you to get started, and experimenting does the rest.
Please follow the below steps to configure Subscribe to email:
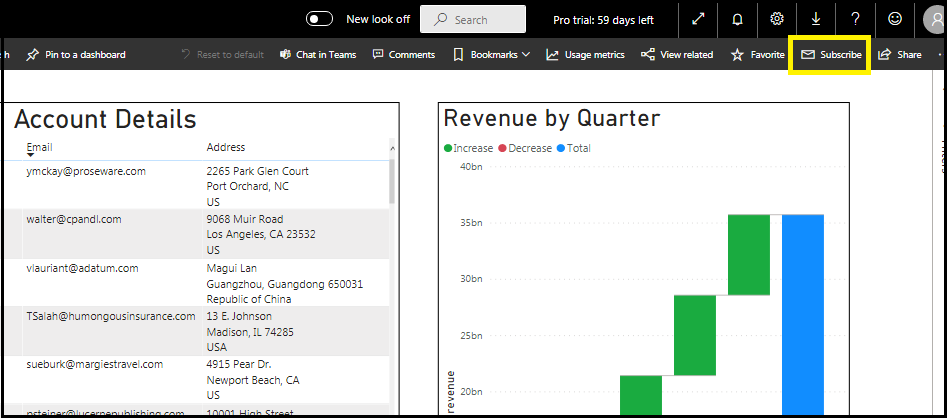
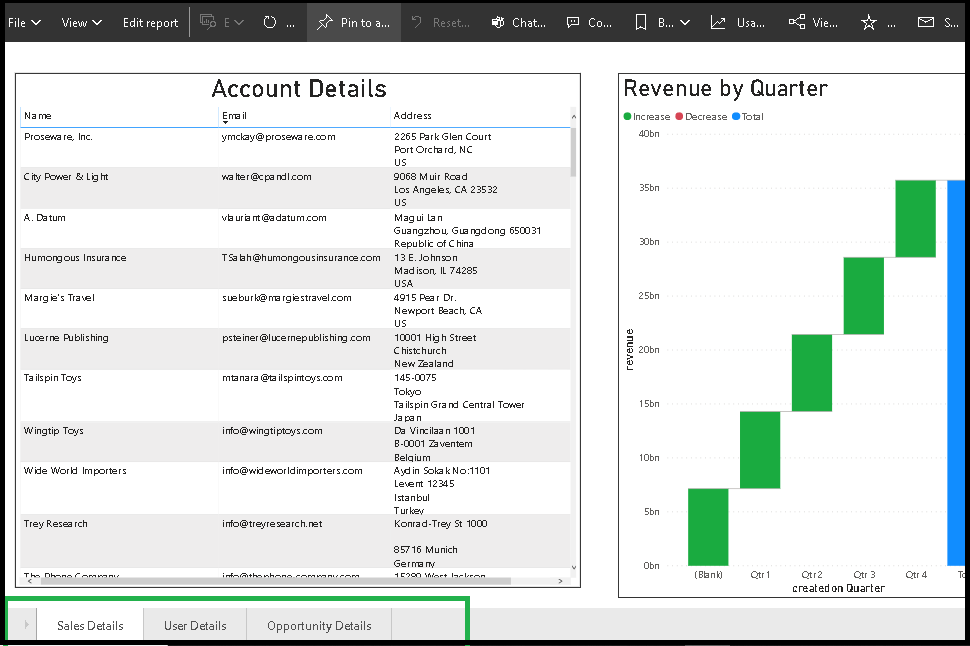
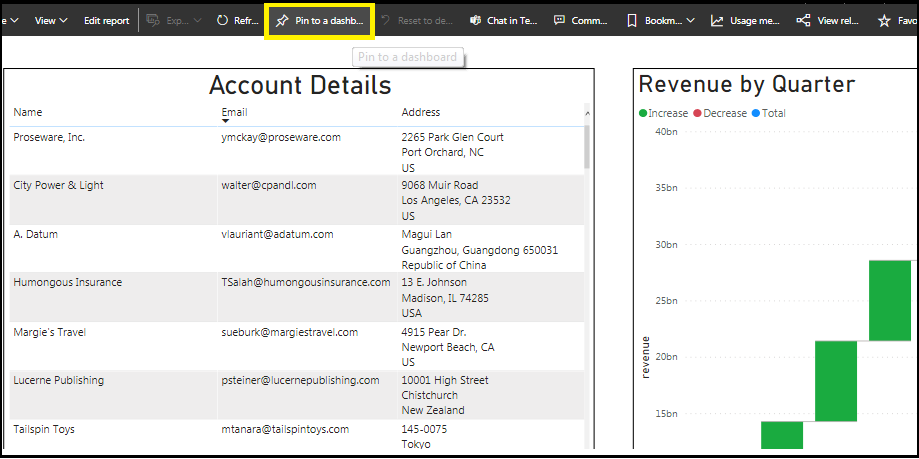
Step 1: To configure ‘Subscribe to email’, we need to click on the “Subscribe” button, please refer to the below screenshot:
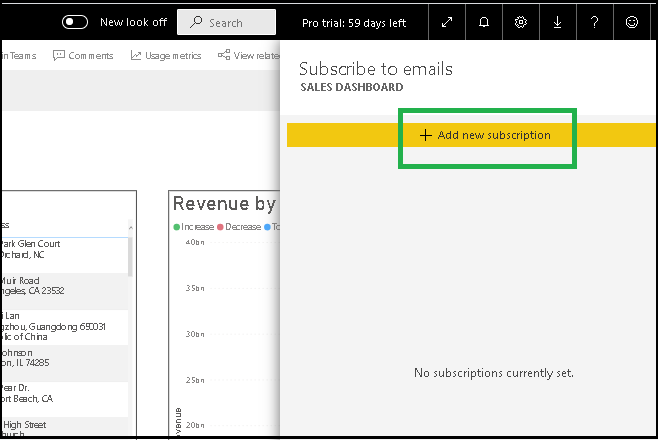
Step 2: On click of the ‘Subscribe’ button a new form will open, click on the “+ Add New Subscription” and the configuration setting will open, as you can see in the below screenshots:
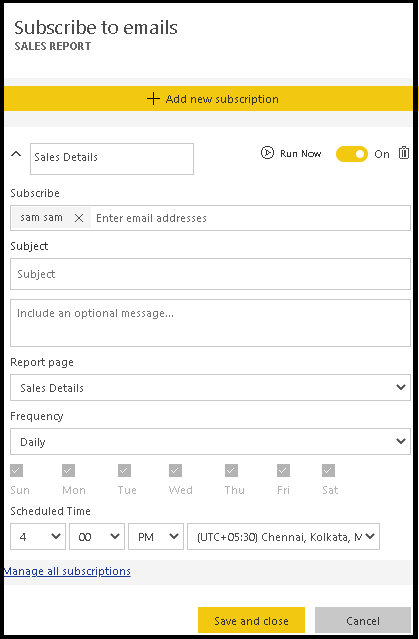
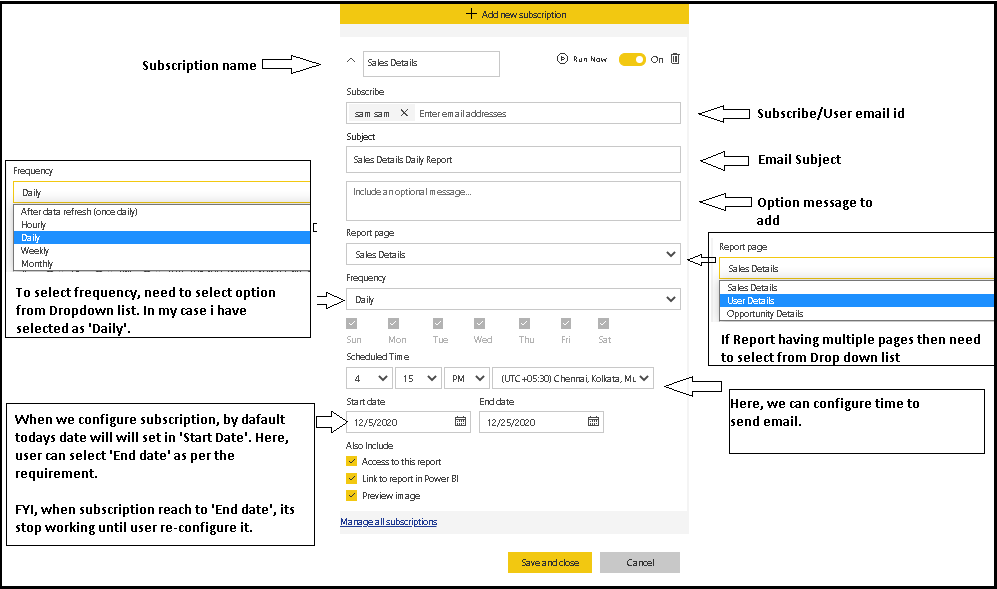
Step 3: For the next step, we need to configure details like Subscription name, email subject, an optional message, Frequency (i.e. Send email on Hourly/Daily/ Weekly/Monthly/ after data refresh basis), schedule Time (i.e. Time to send email) and other details.
Step 4: Click on the ‘Save and Close’ button and it will start working for you.
Note:
This feature is suitable if you have charts in Reports or have a limited number of records that fit in a table. If you have a large number of records in a table and to view all records you need to use the scrollbar/Pagination then “Subscribe” will not work properly. Since it takes a screenshot of the current visual, it leaves remaining records. FYI, in the email, it will have a “Go to Report” button, so the user can open an embedded report and view all details here.
a)If the Report having multiple pages and you want to send all pages then need to create a new subscription for each page. And for each page user will receive a separate email.
Send Power BI Dashboard details through Email:
Using the “Pin a Dashboard” button we can add report all pages to the Dashboard. And using the “Subscribe” button we can configure ‘Send to email’ for Dashboard.
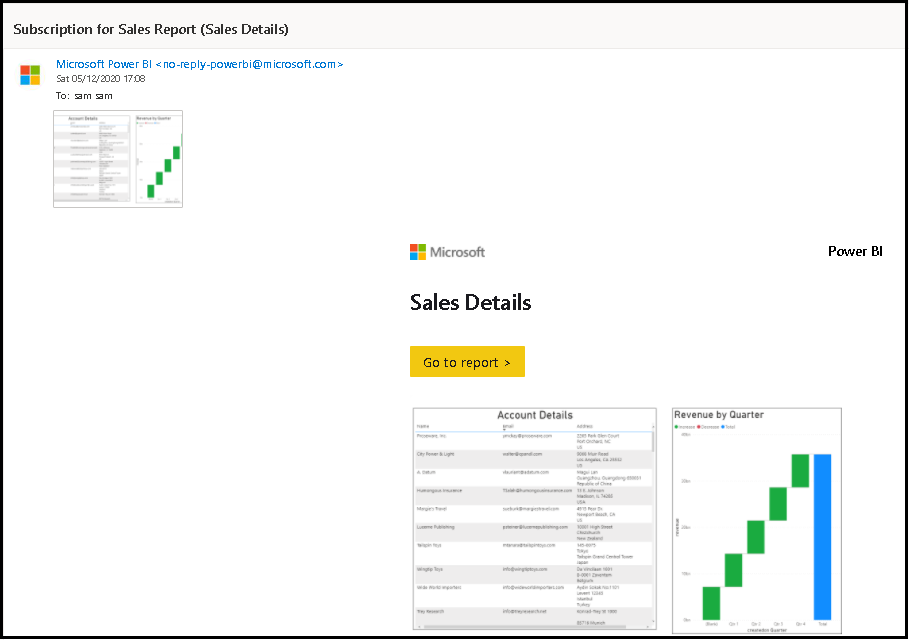
Here, the user will receive a single email that will have a screenshot of Dashboard (i.e. Show all pages in a single screenshot that are added on Dashboard).
Below is the screenshot received Email:
b) On-Off, delete or Manually run Subscription:
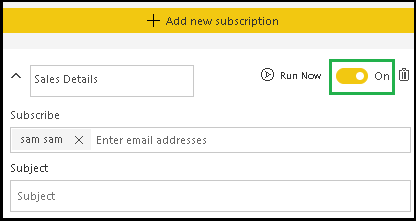
On-Off Subscription: Using the Yellow on/off toggle button we can enable or Disable subscription. If you don’t want to trigger Subscription then need to set ‘off’ here.
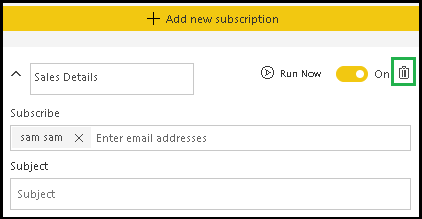
Delete Subscription: By clicking the delete button icon, we can delete the subscription.
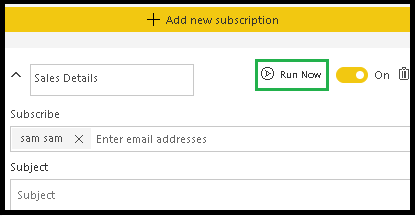
Run Now: We can test Subscription by clicking the “Run Now” button, it will send an email right away.
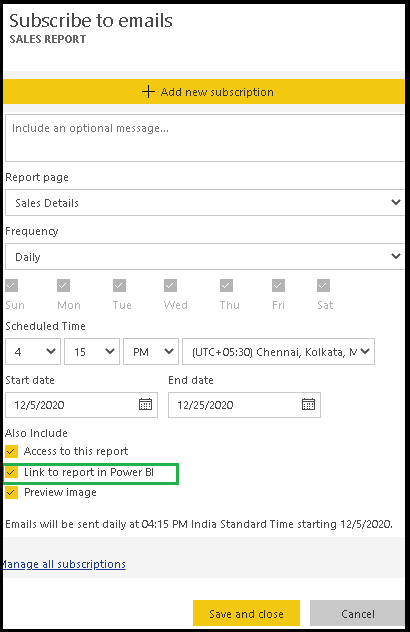
Remove ‘Go to Report’ button: If you don’t want the ‘Go to Report’ button in the email then un-check the “Link to report in Power BI” property. By default this property is checked/enabled, as shown in the below screenshot:
Here, we will see how to send an email via outlook using Power Automate REST API. Also, it allows you to send emails to multiple users. To implement this, let us create a flow and the following steps are:
On Power Automate, create an instant cloud flow that will trigger manually.
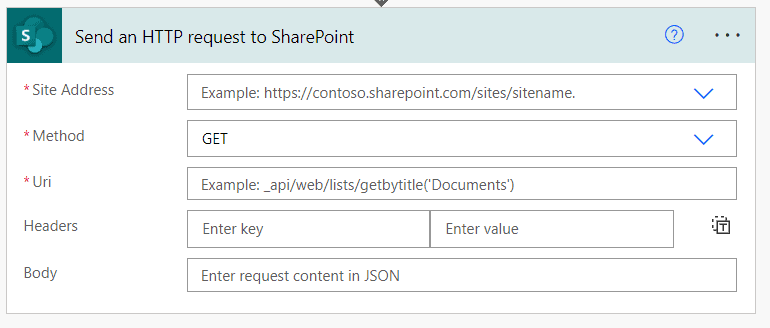
Under the trigger, add a ‘Send an HTTP request to SharePoint‘. Then provide the SharePoint site address and set the properties such as:
Method – POST
Uri- _api/SP.Utilities.Utility.SendEmail
Headers-
accept – application/json;odata=verbose
content-type – application/json;odata=verbose
Body–
{
                "properties": {
                    "__metadata": { "type": "SP.Utilities.EmailProperties" },
                    "From": "sonam@tsinfotechnologies.onmicrosoft.com",
                    "To": { "results": ["user3@tsinfotechnologies.onmicrosoft.com", "user2@tsinfotechnologies.onmicrosoft.com"] },
                    "Subject": "Test email",
                    "Body": "Hey !! It is a sample email for testing purposes!"

                }
}
Power Automate REST API send email
Now, save the flow, test it manually, and run the flow. We can see it will send an email notification to the mentioned user(s) via outlook like below:
power automate outlook rest API.
similarly, an email has been sent to another user. This is how to send an email using Power Automate REST API.
Here, we will see how to create a SharePoint list in a SharePoint site that retrieves from another SharePoint list.
For example, we have a sample SharePoint list having some random data on a specific SharePoint site.
power automate rest API json
Now we will call an API to SharePoint using JSON that will get all the information from the above SharePoint list and create a new SharePoint list on another SharePoint site. To implement this, we are going to create a flow and the following steps are:
On Power Automate, create an instant cloud flow that will trigger the flow manually.
Power Automate rest API using json
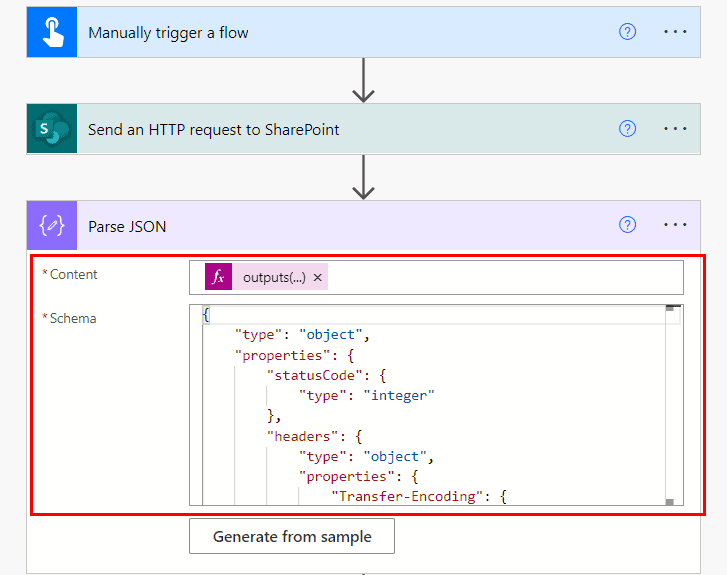
Next, we will add a ‘Send an HTTP request to SharePoint‘ action to retrieve the data from the above list of the source SharePoint site.
Click on + New step > Send an HTTP request to SharePoint. Give the source SharePoint site address and the below parameters:
Schema – click on the ‘Generate from sample’ and paste the json code that copied from the above action.
power automate send rest api using JSON
To create a list on another SharePoint site, add another ‘Send an HTTP request to SharePoint ‘ action, provide the destination SharePoint site address, and set the rest properties such as:
Now the flow is ready to run, so just click on save, and test it manually. We can see it will create a new blank list in the provided SharePoint site like below:
power automate call rest API to SharePoint
This is how to use the JSON to create a SharePoint list in the Power Automate REST API.
In Power Automate there is a connector ‘HTTP’ that is used to invoke the REST API to the workflow and get the responses as needed, but this action is only for a premium connection.
There is another action ‘Send an HTTP request to SharePoint‘ that construct a SharePoint REST API to invoke. This SharePoint REST API allows operations to work with SharePoint list, list items, sites, folders, and files.
Power Automate SharePoint REST API
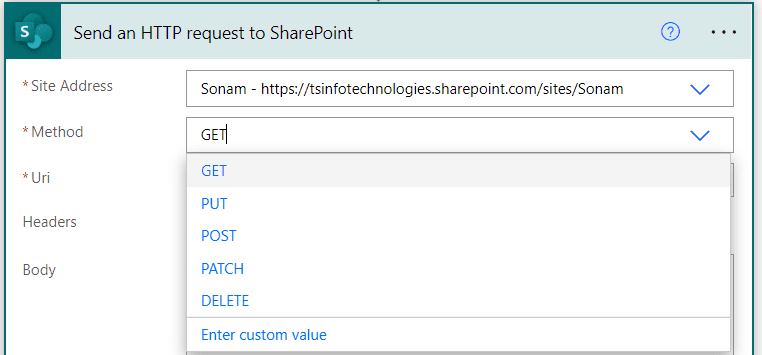
To perform the operations, we need to insert the method from the drop-down list. The available methods are:
GET– This HTTP GET method is used to read or retrieve the information from the SharePoint server.
POST– To create or write a new item in the SharePoint list, we need to use the REST API POST method.
PATCH– This method is used to update an item in the SharePoint online list.
DELETE– This HTTP method is used to delete a SharePoint object like a SharePoint list, document library, and an item.
PUT– This method is used to remove the old item from the SharePoint list and update the existing object (i.e. an item in the SharePoint list).
Power Automate REST API HTTP method
Next, we have to provide the Uri by invoking an API. The Uri stands for Uniform Resource Identifier which identifies one resource from another.
In this example, we will see how to create a dynamic SharePoint list from a template using the REST API.
To create the SharePoint list, the following steps are:
Let’s create an Instant cloud flow that triggers the flow manually. On Power Automate, click on create > Instant Cloud Flow > Manually trigger a flow > Create.
Create an instant flow on Power Automate
Add an action ‘Send an HTTP request to SharePoint‘ under the trigger and provide the SharePoint site address where to create the SharePoint list. Also, set the properties such as:
How to create a SharePoint list item using Power Automate REST API
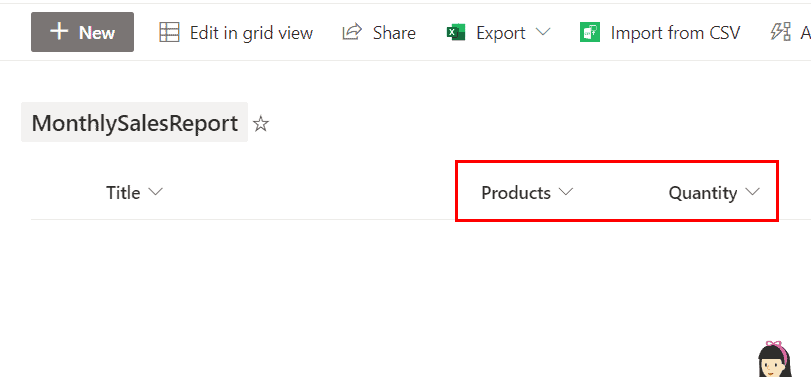
Similarly, we will see how to create an item in the SharePoint list using Power Automate REST API. Here we are going to use the previous SharePoint list i.e. MonthlySalesReport and add some random columns such as Products(Single line text) and Quantity(Number).
Power Automate HTTP request REST API
To insert the data in the SharePoint list, we will create a flow using Power Automate REST API. The following steps are:
On Power Automate, create an instant cloud flow that will trigger the flow manually.
Then add a ‘Send an HTTP request to SharePoint‘ action and provide the site address of the SharePoint. Also, set the properties such as:
Method – POST
Uri – _api/web/Lists/GetByTitle(‘MonthlySalesReport’)/Items
Power Automate REST API gets SharePoint list items
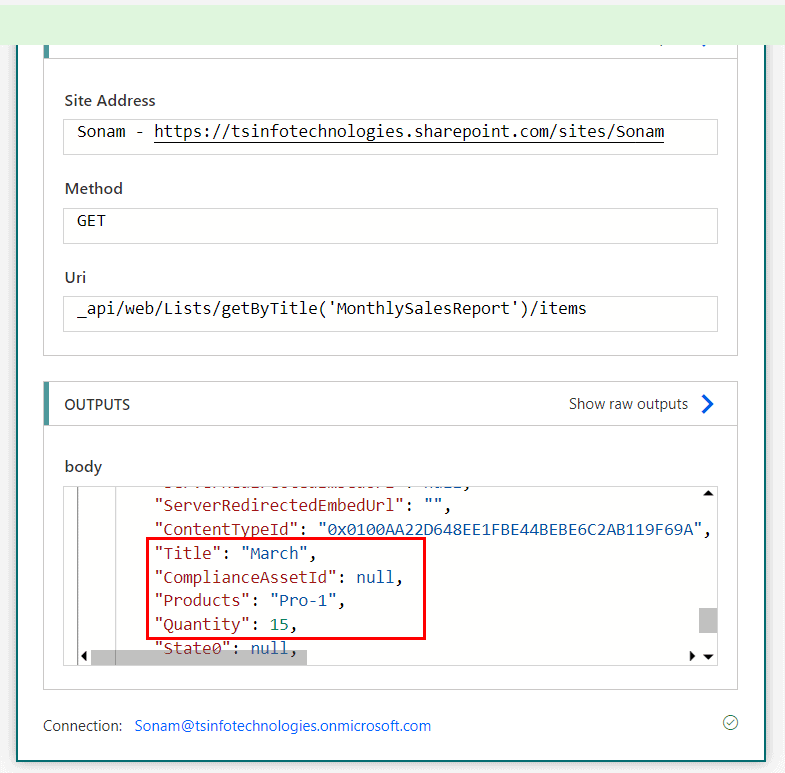
Here, we will see how to get the item from the SharePoint list using Power Automate REST API. Let’s take the previous SharePoint list to implement this.
To read the items from the SharePoint list, we are going to create a flow. The following steps are:
On Power Automate, create an instant cloud flow that triggers the flow manually.
Under the trigger, add an action ‘Send an HTTP request to SharePoint‘ and provide the SharePoint site address. Set the below properties such:
Now, click on save and test it manually. We can see it will retrieve the items that store in the SharePoint list. (As there is 1 item, it will so only that item).
Power Automate REST API gets the SharePoint items
This is how to retrieve the SharePoint item using Power Automate REST API GET method.
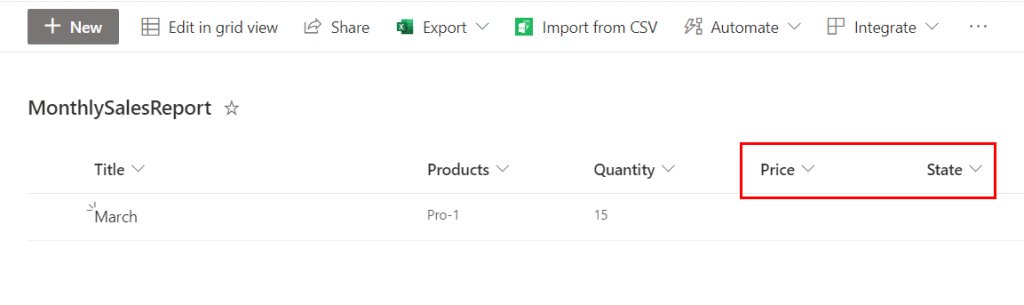
In this example, we will see how to create a custom column in a specified Sharepoint list using Power Automate REST API.
To implement this, we are going to use the SharePoint list that will created previously i.e. MonthlySalesReport.
Now, we will create a flow that will create a custom column in the existing SharePoint list. The following steps are:
On Power Automate, create an instant cloud flow that triggers the flow manually.
Under the trigger, add an action ‘Send an HTTP request to SharePoint‘. Provide the SharePoint site address and give the below details on the properties.
Method – POST
Uri – _api/web/Lists/getByTitle(‘MonthlySalesReport’)/fields
Note – Here the field name is State and the FieldTypeKind as 2 refers to the type of the field i.e. text. You can get more ideas about it from the FieldType Enumeration provided by Microsoft.
Similarly, we will create another column (currency type) i.e. Price in the existing SharePoint list. For this, add another ‘Send an HTTP request to SharePoint‘ action, and in the body, add the below REST API code.
Power Automate REST API SharePoint update list item
Now we will see how to update an existing list in the specified SharePoint list using Power Automate REST API. For example, we will update the title from March to February in the previous SharePoint list(i.e. MonthlySalesReport).
To create the flow, the following steps are:
On Power Automate, create an instant cloud flow the trigger the flow manually.
Under the trigger, add the action ‘Send an HTTP request to SharePoint‘ and provide the SharePoint site address.
Method – PATCH
Uri – _api/web/Lists/getByTitle(‘MonthlySalesReport’)/items(2)
Power Automate REST API delete a SharePoint list item
Similarly, here we will see how to delete an existing item from the SharePoint list using REST API. Let us take the previous SharePoint list to implement this.
Follow the below steps to create the flow.
On Power Automate, create an instant cloud flow that trigger the flow manually.
Add an action ‘Send an HTTP request to SharePoint‘ and provide the SharePoint site address.
Power Automate REST API deletes an item in the SharePoint list
Now, save the flow and test it manually. We can see it will delete the item whose ID is 2. (As there is only 1 item, so the list will appear as blank).
Power Automate REST API deletes an item in the SharePoint list
This is how to delete a specific item from the SharePoint list using Power Automate REST API